
HOW TO: Redirect your student e-mail
Step 1: Open a Web browser, and enter the following URL for the eGuide: http://ldap.okstate.edu
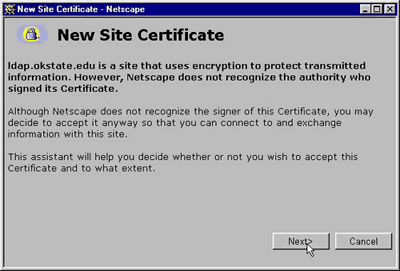
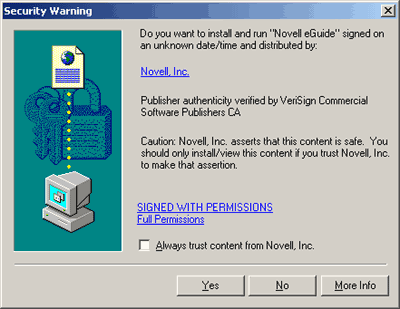
When you enter the eGuide, you may be prompted with several New Cite Certificate or Security Warning screens (see examples from Netscape and Internet Explorer below). Please click on the Next or Yes buttons on these windows, as appropriate, to accept the security certificates.
 |
 |
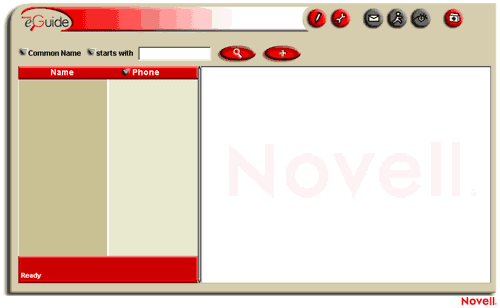
When the eGuide has finished loading, it will look like this:
Step 2: Place your cursor in the white rectangular
box to the right of ![]() and
type your last name.
and
type your last name.
(If your last name is fairly common, you may want to show the second search
row by clicking on the ![]() ,
and entering your first name.)
,
and entering your first name.)
Step 3: Then press the Enter
key on your keyboard, or click on the magnifying glass icon ![]() .
.
Step 4:
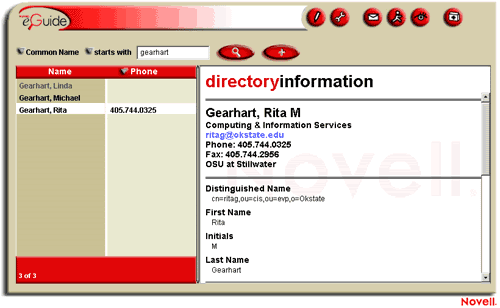
All entries in the OSU system that include the name(s) you entered will appear
in the left column. Find your name in the list and click once on it to display
your information in the  area on the
right side. See example below:
Step 5: To make changes to your entry, you must login to the eGuide and provide the following pieces of identifying information:
1. Your Novell network context
2. Your User ID (also called User Name)
3. Your Novell network password
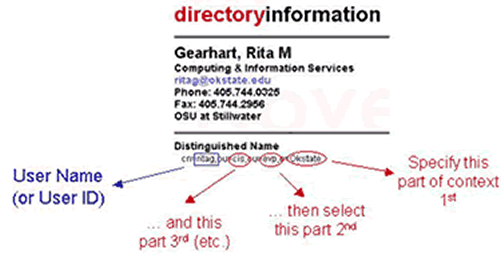
You can easily find your Novell network
context and your User ID in the Distinguished Name field of your  .
The name to the right of "cn=" is your User ID (or User Name), and
the names to the right of either "ou=" or "o=" comprise
your context. When you specify your context during login to the eGuide, you
begin with the name to the right of the "o=", then work your way left.
See the example below:
Step 6: To login, click on
the pencil icon ![]() at
the top of the eGuide. You will be prompted with the following login dialog
box:
at
the top of the eGuide. You will be prompted with the following login dialog
box:
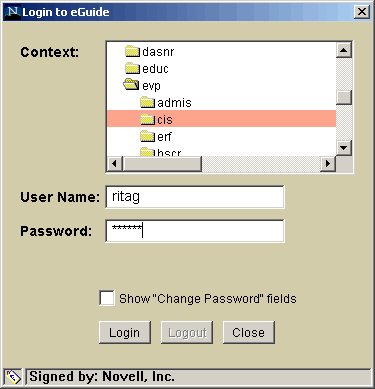
You specify your network context by clicking on the folders in the Context box (as described in Step 4 above), then enter your User Name and Novell network password. When you have all of your information entered, click on the Login button.
Step 7: If your login is successful,
you will now see a Change Information icon ![]() next
to the Directory Information Header:
next
to the Directory Information Header:
![]()
Click on this icon to make changes to your directory information.
Step 8: When you have logged into the eGuide, you will see a red cursor icon at the top of your directory information. Click this icon to change your entry information. You will be prompted with a screen similar to the one below:
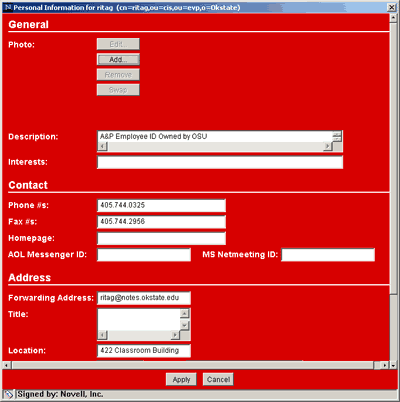
Step 9: Find the Address section (near the bottom of the window), and enter your forwarding e-mail address in the Forwarding Address field. See example below:

Step 10: (Optional) If you wish, you can also add other information to your entry here in the designated fields.
Step 11: When you have finished
making your changes, click on the Apply button at the very bottom of the window.
(Note: you may have to shrink this window by clicking on one corner & dragging
it in diagonally before you see the Apply button at the bottom of the window.)
Definition of Terms:
SMTP (Simple Mail Transfer Protocol) has the important job of defining
how to send an electronic mail message to a server, how to find the message
recipient, and what to do if a recipient or server is unavailable.
Gateways are computer systems that act as translators between two systems with
differing communications protocols, data formatting structures, languages and/or
architecture. In this context, a gateway moves messages from one electronic
mail system to another, acting as a protocol converter between different e-mail
formats.
MTAs (message transfer agents) are integrated server tasks that provide scalable, high-performance routing and relaying of messages in their native format. Since they are built into Notes, they are generally more reliable and give better performance than gateways.